How I Build Notion Templates That Actually Work: A Framework for Creating Systems People Love
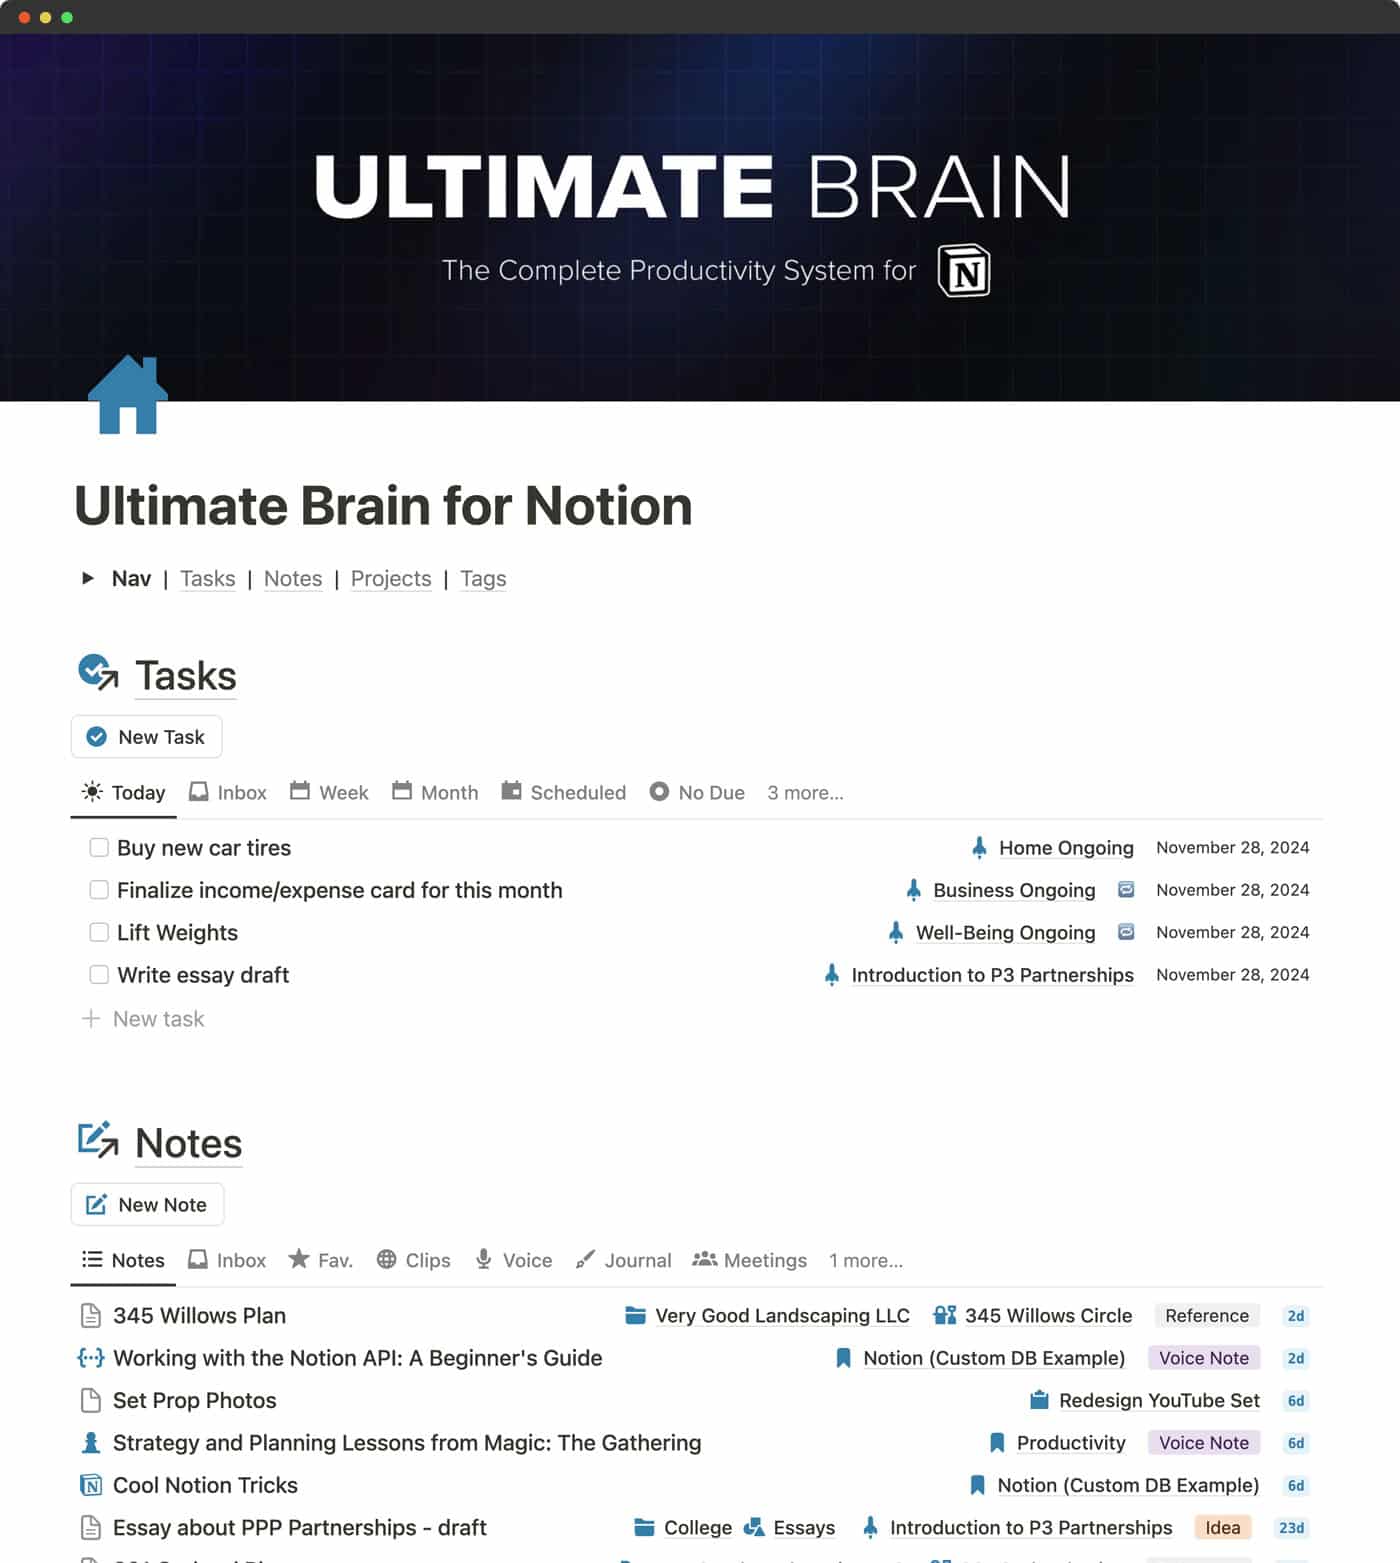
How I Build Notion Templates That Actually Work: A Framework for Creating Systems People LoveAfter building 6 Notion templates over the past 6-8 months and refining my process along the way, I’ve developed a systematic approach that turns complex ideas into user-friendly templates. Whether you’re building a simple task manager or a comprehensive life management system, this framework will help you create Notion templates that actually work. The biggest mistake I see people make? They dive straight into building databases without any plan. They get lost, overwhelmed, and end up with a mess of disconnected tables that nobody wants to use. Here’s the framework I use to build templates that people describe as “well thought out for users.” Step 1: Define Your Core FeaturesBefore touching Notion, get crystal clear on what your system needs to accomplish. Not what would be nice to have—what it absolutely must do. For my Language Learning template, the core feature was spaced repetition for vocabulary review. Everything else was secondary. For my Life Hub template (my most advanced system with 10 databases), the core was implementing the PARA method: Projects, Areas, Resources, and Archives. Ask yourself: If this template could only do one thing perfectly, what would that be? This clarity prevents feature creep and keeps you focused on building something that solves a real problem. Step 2: Draft Your Layout FirstThis step changed everything for me. Instead of jumping into database creation, I create blank pages to map out how users will navigate the template. I use callouts as placeholders for where databases will go. This might seem backwards, but it gives you a clear vision of what you’re building toward. You’ll change plenty along the way, but having a roadmap prevents you from getting lost in the technical details. The biggest benefit? You can almost “test” your template before making the databases. You can navigate through the layout and try to see how it will feel to use it, catching navigation issues and flow problems before you invest time in building complex database structures. Step 3: Create Your System Settings PageThis is where ALL your databases live. Not scattered across different pages—all in one place. I learned this the hard way. In my early templates, I created databases directly on the pages where I needed them. This creates chaos quickly. You can’t find databases to edit them, you accidentally create duplicates, and managing relationships becomes a nightmare. Now, every template has a “System Settings” or “Databases” page where every database is created. Then I use views of these databases throughout the template. Benefits of this approach: - Always know where to find your databases - Easy to edit database properties and structure - Prevents accidental database modifications - Makes database relationships much clearer Pro tip: Once you finish defining your databases, lock them. This prevents accidental edits when you’re using the template later. Step 4: Build Your MVP DatabasesDon’t try to build everything at once. Start with the core databases that make your main feature work. For my Life Hub template, I started with just four databases: Tasks, Notes, Projects, and Areas—the core of the PARA method. I tested the relationships between them, played with different views, and made sure the fundamental concept worked before adding anything else. This is where you’ll spend most of your time figuring out: - Which databases need to connect to each other - How those relationships should work - Whether your core concept actually functions as intended Once the foundation is solid, then you can add the bells and whistles. Step 5: Master Database Relationships and Advanced FeaturesAs you build your MVP, you’ll likely need these key Notion features: Relations: Link databases together. For example, connecting a Tasks database to a Projects database so you can see all tasks for a specific project. Rollups: Display properties from related databases. This lets you show summary information, like the number of completed tasks for each project. Formulas: Add logic to your databases. In my task system, I use a formula that displays colored circles based on whether tasks are on time, late, or overdue—green for today’s tasks, red for overdue, yellow for in progress, and blue for future tasks. Don’t let formulas intimidate you. I’m not a developer, but with AI help and some patience, you can create powerful logic for your databases. Automations: Make your template work automatically. My recurring tasks automation is a game-changer—when I complete a recurring task, it automatically creates a new instance with the next due date. Step 6: Add Database Views to Your LayoutNow comes the fun part: adding your databases as views into those callout placeholders you created earlier. Experiment with different view types: - List views for simple, scannable information - Kanban boards for workflow management - Gallery views for visual displays (underused but powerful—you can show tons of information as cards) Spend time deciding which properties to show in each view and which ones users need to click into cards to see. The goal is to surface the most important information immediately while keeping views clean. Step 7: Test, Refine, and PolishThis is where I do a lot of back and forth: - Testing how database views display information - Adjusting which databases link to each other - Tweaking formulas and automations - Refining the overall user experience For my Life Hub template, I started with 4 databases and gradually added 6 more: time tracking, goal management, people database, and others. Each addition was tested to ensure it enhanced rather than complicated the system. The final step is adding tutorials and explanations for users who will use your template. Why This Framework WorksThis systematic approach solves the three biggest problems I see with Notion templates:
The result? Templates that feel intuitive to use and solve real problems. Getting StartedBuilding effective Notion templates isn’t about mastering every advanced feature—it’s about systematic thinking and user-focused design. Start small. Pick one problem you want to solve, define the core feature, and work through this framework step by step. You’ll be surprised how quickly you can build something genuinely useful. Remember: the best Notion template is the one that gets used consistently, not the one with the most complex formulas. Building Notion systems has transformed how I manage both my personal life and freelance business. If you’re interested in seeing these principles in action, check out my templates at https://tinyblocks.gumroad.com/ where you can see the end result of this approach. |
Tinyblocks
Discover premium Notion templates and productivity hacks for iOS/Mac.
How I Built a Professional Website in One Day (No Code Required) Last week, I decided to start my Notion consulting business. By the end of the day, I had a fully functional, professional website live on the internet. No coding experience required. The result: www.tinyblocks.net – a clean, conversion-focused landing page that represents my business exactly how I envisioned it. Here’s the exact process I used to go from idea to live website in just one day, and how you can do the same. Hero...
Notion Mail: My 2-Month Experience Transforming Email Management Ever feel like your inbox controls you instead of the other way around? For the past two months, I’ve been using Notion Mail as an alternative to traditional email clients, and it’s changing how I think about email management. What is Notion Mail? Notion Mail is Notion’s entry into the email management space, now accessible to all users. It integrates directly with your existing email accounts and brings Notion’s organizational...
Building a System That Works: My Journey to a Streamlined Digital Workspace Last year threw everything at me at once – relocating from Europe to Korea, traveling for months, and navigating major personal milestones. All while maintaining my freelance design business. I quickly found myself drowning in endless task lists, scattered information, and mounting anxiety about what I might be forgetting. When Simple Systems Break Down Before this upheaval, my relationship with Notion was casual....